Stratagems
It takes more than weapons to win a battle. Stratagems represent the other elements that a Princeps Seniores may bring to bear when waging war, such as support from ground units, emplaced weapons, artillery strikes and unusual strategies.
There are several categories of Stratagems. Each individual Stratagem costs a number of Stratagem points, as shown in brackets before its name. In Matched Play and Narrative Play, the mission that has been chosen will give each player a number of Stratagem points to spend. In Open Play, players should decide before the battle starts whether they will have access to Stratagem points, and if so, how many. Stratagems are a good way to assist an outmatched force - in Matched Play, it is generally the case that the player with the lowest Battle Rating gains a bonus Stratagem point for every 200 points of difference in ratings, so a similar system could be used in Open Play.
Choosing Stratagems
Immediately before forces are deployed, each player chooses their Stratagems. They spend their Stratagem points secretly, either taking cards from the Stratagem deck with the relevant total, or choosing them from the lists of Stratagems that follow and writing them down. Unless otherwise stated, each Stratagem can only be taken once.
Stratagems are kept secret from the other player until they are used, at which point they are revealed.
Tricks and Tactics
Noble Sacrifice (1)
A player can enact this Stratagem during the Strategy phase. To do so, they pick a Titan from their force whose structure has been compromised and roll a D6. Add 1 to the result if its Reactor Status marker is in a hole with an orange indicator, or add 3 to the result if it is in a hole with a red indicator. The Titan suffers a Magazine Detonation on a result of 1-4, or a Catastrophic Meltdown on a result of 5-6 (see the Catastrophic Damage table on page 36). At the end of the battle, the player loses a number of Victory points equal to the Titan's Scale.
Outflank (X)
When this Stratagem is chosen, the player secretly writes down one of their units. The cost of the Stratagem is equal to half the unit's Scale, rounding up. Play this Stratagem at the start of deployment to set that unit to one side and state that it is outflanking (it is not deployed with the rest of its battlegroup). Write down which of the battlefield's neutral flanks it will arrive on, but do not reveal this to the opposing player. While the unit is not on the board, it cannot be activated, and so cannot be issued orders.
At the start of the Movement phase of the first round, the unit appears on long range auspex - reveal to the opposing player which neutral flank was chosen. During the Movement phase of the second round, the outflanking unit can be activated. When it is, it is set up so that the Rear arc of its base is touching the chosen flank. It cannot move any further during the phase.
If a player's battlegroup contains any Squadrons (see page 45), they can choose this Stratagem more than once, as long as each outflanking unit is part of the same Squadron.
Sabotage (2)
Play this Stratagem at the start of any phase. Pick an enemy unit which does not currently have Shutdown orders, remove its current order (if any), then roll an Order dice - the unit immediately takes the order shown. If it cannot be issued that order, re-roll the dice.
Thermal Mines (2)
Play this Stratagem immediately after an enemy unit finishes moving or making a turn. That unit suffers D3 Strength 10 hits to its legs. Shield saves cannot be made against the hits.
Voidbreaker Field (2)
Play this Stratagem immediately after an enemy unit with active void shields finishes moving or making a turn. Roll a D6. On a 2 or more, the opposing player must immediately make a number of Shield saves equal to the number rolled on the D6. On a 1, the Stratagem can be used a second time, in a subsequent turn.
Ranged Support
Artillery Bombardment (2)
Play this during each Strategy phase. Place the 5" Blast marker anywhere on the battlefield, then scatter it D10". Any unit touched by the marker where it eventually lands suffers a Strength 8 hit, or two Strength 8 hits if the central hole of the Blast marker is entirely over its base.
Orbital Lance Strike (2)
Once per battle, play this during the Strategy phase. Place the 3" Blast marker anywhere on the battlefield, then scatter it D6". Any unit touched by the marker where it eventually lands suffers D3 Strength 10 hits, or 2D3 Strength 10 hits if the central hole of the Blast marker is entirely over its base.
Blind Barrage (1)
Once per battle, play this during the Strategy phase. Pick a unit on the battlefield. Any attacks that target it or are made by it suffer a -2 To Hit penalty for the duration of the round.
Tertiary Objectives
These Stratagems can only be selected during Matched Play.
Cripple the Foe (2)
Play this at the end of the battle. Score 2 Victory points for each enemy Titan that has not been destroyed, but which is Structurally Compromised. In addition, score 2 Victory points for each enemy Battlefield Asset (see page 65) that has been destroyed.
Decapitating Strike (2)
Play this at the end of the battle. If the opposing player's Princeps Seniores' Titan has been destroyed, score Victory points equal to half its Scale (rounding down).
Break Through (1)
The player can enact this at the end of the battle to score 1 Victory point for each of their units with a Scale of 5 or more that is within 9" of their opponent's edge of the battlefield.
A Score to Settle (1)
Play this at the end of the battle. Score 1 additional Victory point for each enemy unit that has been destroyed.
Battlefield Assets
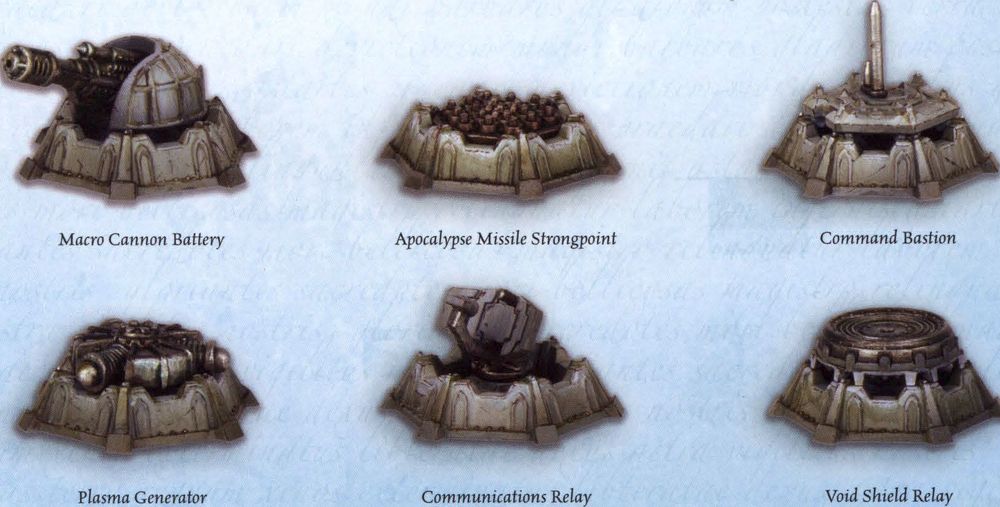
These Stratagems are represented on the battlefield by miniatures (as shown below) and give ongoing benefits to its owning player. A Battlefield Asset Stratagem can only be chosen by a player who has an appropriate model to represent it. A player with one or more Battlefield Assets sets them all up immediately before deploying their first unit at the start of the battle. Each one must be set up so that it is fully within the controlling player's deployment zone.
Battlefield Assets can be targeted by attacks, and are hit by Blast markers, Flame templates and area effects (such as exploding reactors) in the same way as a unit. Hit rolls against Battlefield Assets have a -1 penalty at Short range and a -2 penalty at Long range. Attacks against Battlefield Assets use the following Damage table:
- 12-15: Glancing Hit. Roll a D6. On a 5 or 6, the Battlefield Asset is destroyed.
- 16+: Critical Hit. Roll a D6. On a 3 or more, the Battlefield Asset is destroyed.
Units can move across Battlefield Assets without penalty. If a Titan's base crosses a Battlefield Asset as it moves, there is a chance it will crush it underfoot. If it does so, roll a D10, or a D6 if the Titan's move ends with its base over the Battlefield Asset. If the result is lower than the Titan's Scale, the Battlefield Asset is destroyed.
Command Bastion (1)
A command bastion allows the owning player to issue one more order after they fail a Command check when issuing orders in the Strategy phase. The order must be issued to a unit within 18" of the command bastion. Note that this does not allow more than one order to be issued to a unit.
Apocalypse Missile Strongpoint (2)
In the "Enact Stratagems" step of the Strategy phase, the owning player can make an attack with the strongpoint's apocalypse missile launcher, using the profile which follows. The strongpoint has a Ballistic Skill/Weapon Skill of 4+ and a 360° firing arc.
| Range (S) | Range (L) | Accuracy (S) | Accuracy (L) | Dice | Strength | Traits |
|---|---|---|---|---|---|---|
| 30" | 120" | - | +1 | 5 | 4 | Barrage |
Plasma Generator (1)
When the owning player activates a unit within 1" of the plasma generator in the Movement phase, they can declare that it will draw power instead of moving or making turns (or attacking, if it has First Fire orders). The unit does nothing when it is activated, but its Reactor level is reduced by D3.
Communications Relay (2)
Subtract 1 from the result of any Command checks for units that are within 18" of a communications relay that is owned by the enemy.
Macro Cannon Battery (2)
In the "Enact Stratagems" step of the Strategy phase, the owning player can make an attack with the battery's macro cannon, using the profile that follows. The battery has a Ballistic Skill/Weapon Skill of 4+ and a 360° firing arc.
| Range (S) | Range (L) | Accuracy (S) | Accuracy (L) | Dice | Strength | Traits |
|---|---|---|---|---|---|---|
| 12" | 24" | - | -1 | 2 | 10 | Ordnance |
Void Shield Relay (2)
Failed Void Shield saves can be re-rolled for units that are within 2" of a friendly void shield relay, and which have not moved (voluntarily or involuntarily) this round.
Battlefield Assets
Each Battlefield Asset is represented by a plastic miniature; all six can be found on the Adeptus Titanicus game accessory sprue.