Basic Rules
Basic Rules, Advanced Rules & Optional Rules
The rules for Adeptus Titanicus are divided three ways. The Basic Rules make up the bulk of this section and cover everything that players need to engage in their first few battles - they explain how Titans move, fight and repair, but avoid too much complexity. The Advanced Rules (which start on page 41) complete the game experience as it is intended to be played, introducing additional rules for orders, battlefield terrain and so forth. Finally, the Optional Rules (see page 52 onwards) should only be used if both players agree, and are not considered a necessary part of the ruleset. Generally, they add more thematic scope to a battle and make for a more cinematic experience, but can slow things down, especially in larger games.
The Basic Rules are divided by phase. Where an Advanced Rule would apply, a side note will give the Advanced Rule's location in the book for easy reference.
We recommend that players use the Basic Rules only for their first few games, then introduce the Advanced Rules once they feel comfortable with how things work.
Rounds & Phases
A game of Adeptus Titanicus is divided into rounds, usually between four and six (although some scenarios might be shorter or longer). Each round consists of five phases, each of which lets players do something different with their units. These phases always occur in the same order:
- Strategy phase
- Movement phase
- Damage Control phase
- Combat phase
- End phase
In each phase, apart from the End phase, players alternate activating one of their units and taking an Action with it (the Action depends on the current phase). Each unit can only be activated once per phase. Once a player has run out of units to activate, or does not wish to activate any more units this phase, the other player has the opportunity to activate each of their remaining units in turn.
Timing
Some effects take place at the start of a round or phase. These effects are resolved before anything else happens in that round or phase. Similarly, effects that take place at the end of a round or phase are resolved after everything else has happened in that round or phase. If there is more than one of these effects taking place at the same time, the First Player chooses the order in which they take place.
The Strategy Phase
In the Basic Rules, the Strategy phase has only one step, during which the players roll to see who will be the First Player for this round. In the Advanced Rules, players can also enact Stratagems and issue orders to the units under their command.
1. Determine the First Player
The players roll off (see page 24). The winner decides whether they will be the First Player this round, or whether they will let their opponent be First Player. The Opus Titanica emblem, found on the plastic sprue, is used to show who is the current First Player.
Designer's Note
Patience is its Own Reward
It might seem strange to give your opponent the chance to be First Player - after all, why wouldn't you take the opportunity to attack first? However, as you play more games, you will realise that there are times when you will want to wait in order to see what your opponent does before reacting accordingly.
Making a Command Check
There are several situations in which a unit might need to make a Command check - most commonly, this is used in the Advanced Rules to issue orders to units in the Strategy phase. To make a Command check, the controlling player rolls a D10 and compares the result to the unit's Command value, as shown on the Princeps section of its Command Terminal. If the result is the same as or higher than the Command value, the check is passed. If it is lower, the check is failed. Regardless of any modifiers, a result of 10 always passes and a result of 1 always fails.
Advanced Rules
Enact Stratagems - see page 41
Issue Orders - see page 41
The Movement Phase
In the Movement phase, players have a chance to move their units around the battlefield. Careful movement is the key to victory, and there are usually ways for even a heavily outnumbered force to win through canny manoeuvring.
During the phase, the players take turns activating a unit and moving it, starting with the First Player. When one player runs out of units to activate, or does not wish to activate any more units, the other player activates each of their remaining units in turn. Note that a unit that has been activated does not need to move or turn - it can be activated and still remain stationary.
Pushing the Reactors
Titans are powered by massive, unstable plasma reactors. Mechanicum law dictates that a Titan's reactors should never be pushed beyond its safe operating limits, but in the heat of battle, crews are often willing to transgress this.
If the rules instruct a player to push a Titan's reactor, its Reactor Status marker is advanced by one hole. If the Status marker is in a hole with an orange or red indicator during the Damage Control phase, there is a chance it will cause an overload (see page 43). If a Titan's Reactor Status marker is already in the last hole on the track, it cannot be voluntarily pushed. If a game effect causes the Reactor level to advance while it is in the last hole, the Titan suffers a Strength 9 hit to its Body, bypassing void shields.
The reactor can be pushed multiple times in the same turn, either for the same bonus effect or for different ones.
Advanced Rules
Reactor Dice - see page 43
Wartorn Landscapes - see page 43
Moving
When a model is activated in the Movement phase, it can move in a straight line a number of inches up to its default Speed characteristic (the first value shown under Speed on its Command Terminal). The model must move within its Front arc, but its facing does not change even if it moves at a diagonal.
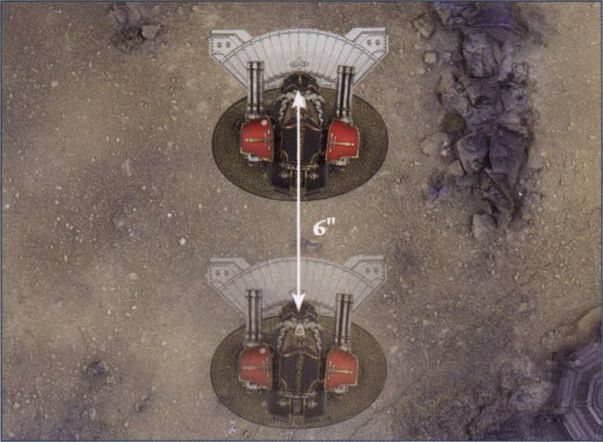
Models are able to change direction partway through a move - for instance, you could move a model straight forward for half its Speed, then move diagonally for the remainder.
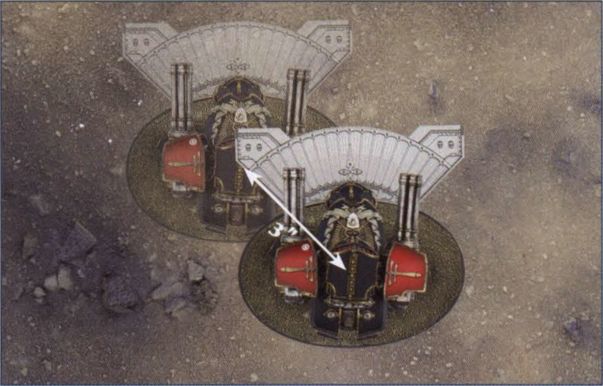
Sidestepping and Backing Up. Models are also able to move outside their Front arc (again, their facing does not change) but if they do so, every inch they move takes up 2" of their Speed. For example, a Reaver Titan (Speed 6") could sidestep to the right up to 3". Again, forward and sideways movement can be mixed - the Reaver could sidestep 2" to clear a building, then move its remaining 2" within its Front arc.
Power to Locomotors! When a Titan is activated in the Movement phase (or in the Combat phase if the model is acting under Full Stride orders), the controlling player can push its reactor (see earlier on this page) to declare Power to Locomotors! If they do this, the Titan uses its boosted Speed (the second value shown under Speed on its Command Terminal) instead of its default Speed for the duration of its activation.
Turning
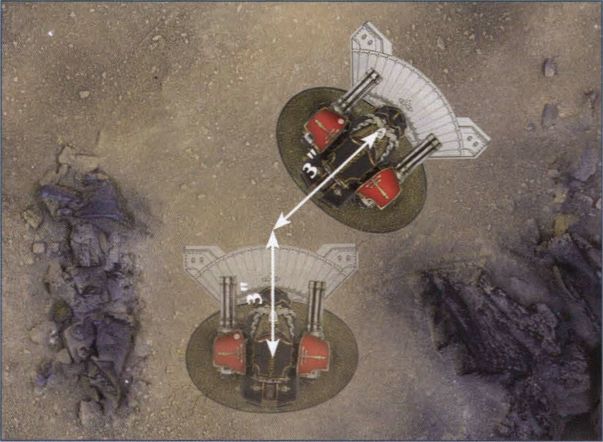
In the Movement phase, a model can make a number of turns equal to its default Manoeuvre characteristic (the first value shown under Manoeuvre on its Command Terminal). A turning model pivots around the centre of its base, and can turn up to 45°. It can make these turns before, after or during its move, and can use multiple turns at the same time to turn more than 45°.
Collisions
Models cannot voluntarily move through other models, or through Blocking terrain (see page 43). If a model is forced to do so, it will stop in base-to-base contact with the model or terrain piece, then it will suffer a collision.
If a model collides with another model, each one inflicts D6 hits on the other, at a Strength equal to its Scale. For example, if a Warhound Titan (Scale 6) collides with a Warlord Titan (Scale 10), the Warhound would suffer D6 Strength 10 hits and the Warlord would suffer D6 Strength 6 hits.
If a model collides with Blocking terrain, it suffers D6 hits. Instead of rolling a D6 and adding Strength, roll 2D6 for each hit and apply the result to the location's Damage table.
Power To Stabilisers! Immediately after making a turn with an active model, the controlling player can push its reactor (see page 30) to declare Power to Stabilisers! If they do so then the model uses its boosted Manoeuvre characteristic (the second value which is shown under Manoeuvre on its Command Terminal) instead of its default Manoeuvre characteristic for the rest of its activation.
The Damage Control Phase
In the Damage Control phase, players roll to see if their Titan's reactors overload, and make Repair rolls for their Titans.
During the phase, the players take turns activating a unit and checking for reactor overloads, then making a Repair roll for it, starting with the First Player. When one player runs out of units to activate, the other player activates each of their remaining units in turn. Each unit must be activated in this phase, even if they have no repairs to make.
Check for Reactor Overloads
If a Titan's Reactor Status marker is in a hole with an orange or red indicator when it is activated in this phase, it is at risk of a reactor overload. In the Basic Rules, the Titan will suffer a Strength 7 hit to the Body location if the marker is in an orange hole, or a Strength 10 hit to the Body location if the marker is in a red hole. These hits bypass void shields.
If the Advanced Rules are being used, the Titan does not suffer the hit. Instead, roll on the Reactor Overload table as described on page 43.
Make Repair Rolls
After resolving any overloads for the activated Titan, the controlling player makes a Repair roll for it by rolling a number of D6 equal to its Servitor Clades characteristic. Once the dice have been rolled, they can spend them to carry out the Repair Actions that follow, in any combination they wish:
Repair Actions. Each Repair Action is followed by a score in brackets. To perform that Action, the player must spend a dice that shows that score or greater. For example, to make a Vent Plasma (4+) Action, they would need to spend a dice showing a score of 4, 5 or 6.
Repair Disabled Weapon (X): Return a flipped Weapon card to being face-up. The score required to do this is shown on the Weapon card's disabled side.
Vent Plasma (4+): Decrease the Titan's Reactor level by 1.
Raise Void Shields (5+)/(6): Restore the Titan's Void Shield level by 1. If the void shields have collapsed, a Repair dice showing a score of 6 is required to reignite the generators and restore the Void Shield level. A second dice, showing a score of 5+, could then be used to restore the shield level further.
Repair Critical Damage (5+): Pick one of the Titan's locations that has a Status marker on its Critical Damage track. If the marker is in the first (yellow) hole, remove it. Otherwise, move it back to the previous hole (red to orange, or orange to yellow).
The Combat Phase
In the Combat phase, players have a chance to attack with each of their units. Players take turns activating a unit and attacking with it, starting with the First Player. When one player runs out of units to activate, or does not wish to activate any more units, the other player activates each of their remaining units in turn.
Combat Sequence
Summary
- Select target
- Declare attacking weapon
- Check firing solution
- Make the Hit roll
- Resolve hits:
- Opponent makes Shield saves, or
- Make the Armour roll
- Repeat steps 2-5 for each remaining weapon.
The Combat Sequence
A Princeps must maintain a cool head in the midst of battle. There may be a dozen contacts closing in or there may be severe damage to the Titan's systems, but the training of a Princeps urges them to close out everything and follow a simple mantra: select target, range, execute, repeat.
When a unit is activated, it attacks with all of its weapons, following these steps:
-
Select Target. Declare a target for the unit's attacks. Note that measuring the range to the target or checking which arc it is within is not allowed at this step.
-
Declare Attacking Weapon. Declare which of the unit's weapons will attack. A weapon that has been disabled cannot make attacks.
-
Check Firing Solution. Once the target has been declared, measure the distance between it and the attacking unit. If this is greater than the weapon's Long Range characteristic, the attack is wasted and it has no effect. Otherwise, determine whether it is within the weapon's Long Range or Short Range, as this may have an effect.
Then, determine whether the target is within the attacking weapon's firing arc (see page 26). If it is not immediately clear which arc the target is in, use the centre of its base as a point of reference. If the centre of its base is exactly on the line between two arcs, it counts as being in both. If the target is not within the weapon's firing arc, the attack is wasted.
Then, check whether the weapon has a clear line of sight to the target. In some cases this might be obvious, but it is usually helpful to stoop down and get a look at the target from the weapon's point of view. If there is nothing in the way, the line of sight is clear. However, if at least a quarter of the model is obscured (by terrain or other models), the attack will incur a penalty on the roll To Hit as follows. If the weapon has no line of sight to the target at all, the attack is wasted.
-
Make the Hit Roll. The controlling player makes the Hit roll to see whether the attack is on target. Roll a number of D6 equal to the attacking weapon's Dice characteristic and compare the result on each to the firing unit's Ballistic Skill. If any of the following factors apply, they will modify the result of each dice in the Hit roll:
-
Each weapon has an Accuracy value for Short range or Long range. If this value shows a positive or negative modifier, this is applied to the Hit roll when attacking at that range.
-
If the weapon's line of sight to the target is at least 25% obscured, apply a -1 modifier to the Hit roll. If it is at least 50% obscured, apply a -2 modifier instead.
After applying any modifiers, compare the dice to the firing unit's Ballistic Skill. Each one that scores less than the Ballistic Skill is a miss and is discarded. Any remaining dice score hits and are gathered together to form the Hit pool. Regardless of modifiers, a roll of 1 always misses and a roll of 6 always hits.
If there is at least one hit, it is now resolved against the target.
Close Quarters. Titans usually engage their targets at long range, but some are equipped with weaponry that makes them utterly deadly at close quarters, where quick-thinking and nimbleness are more important than accurate firing solutions. Attacks made against targets within 2" of the attacking unit use the attacking unit's Weapon Skill rather than its Ballistic Skill. In addition, when making such an attack, a Targeted Attack (see page 35) suffers a -1 To Hit modifier rather than a -2.
5. Resolve Hits. If any hits are caused and the target has active void shields, the target's controlling player makes Void Shield saves. If the target does not have active void shields, or the void shields are ignored or bypassed, the attacking player makes an Armour roll.
5A. Opponent Makes Shield Saves. Titans walk to battle protected by massive void shields, crackling domes of energy which harness the power of the Warp to absorb and dissipate the energy of incoming attacks. These shields are nigh impenetrable, but the generators that project them can be overloaded by sufficiently powerful attacks. For this reason most Titans are fitted with multiple void shield generators, putting a barrier several layers thick between them and harm.
If the target has active shields, its controlling player makes a Save roll by rolling a D6 for each dice in the Hit pool, and comparing them to the target's current Void Shield level (shown beneath its Void Shield Status marker). Each dice that scores the same as or higher than the Void Shield level removes one hit from the Hit pool. Each dice that scores lower than the Void Shield level causes the Void Shield level to be reduced by 1. Note that this reduced Void Shield level is not taken into account until the next time a save is made for the unit. Regardless of modifiers, any dice that roll a 1 always cause the Void Shield level to be reduced, and any dice that roll a 6 always remove one hit from the Hit pool.
Then, any dice in the Hit pool are discarded, even if the void shields have now collapsed. Any remaining hits are assumed to be lost; the death of a Titan's void shields is a pyrotechnic event in itself, an over pressurised blow-out generating a concussive wave and unleashing a thunderous cacophony, and until the atmosphere clears, there is no chance of any hits making it through to the target.
Voids to Full! Immediately before making Void Shield saves for a unit, the controlling player can push the reactors (see page 30) to declare Voids to Full! If they do so then they can re-roll any dice with a score of 1 during that Save roll. If they wish to gain this bonus on later attacks then they will need to push the reactors again.
Ignoring Void Shields. The nature of void shields, and the fact that they manifest as a massive dome around the bearer, makes them useless against attacks that come from very close range. If an attack targets a unit that is within 2", Void Shield saves cannot be made for that unit.
In addition, some attacks bypass void shields. Void Shield saves cannot be made against these attacks.
Impregnable Barrier. Void shields are utterly impenetrable to weapons that are not powerful enough to overload them. Against attacks with a Strength of 3 or less, Void Shield saves are automatically passed.
5B. Make the Armour Roll. If the target does not have active shields, or if the attack has a special rule which states that it bypasses shields, no Save roll is made. Instead, roll a Location dice to see where the hits land - it is assumed that the hits are grouped well enough to all strike the same location. If the location is not visible from the point of view of the attacking weapon, re-roll the Location dice (keep doing this until a visible location is hit). If a "Special" result is rolled on the Location dice, the target's Body is hit unless otherwise stated on its Command Terminal.
Once the Hit location has been determined (see page 28), roll all of the dice in the Hit pool. For each dice rolled, add the attacking weapon's Strength to the result, then consult the target location's Damage table as described on page 28. To determine the effects of the hit, refer to the Damage Effects section on page 35. Resolve each dice one at a time, starting with the lowest and working up to the highest.
Some circumstances can cause the Armour roll to be modified:
- If the attack comes from within the target's Side arc*, add 1 to the result.
- If the attack comes from within the target's Rear arc*, add 2 to the result.
- Some of the holes on each target location's Structure Points track have a modifier shown beneath as +X. If the Structure Points marker for the target location is in a hole with a modifier when the Armour roll is made, apply the modifier to the result. Note that if the marker moves into a hole with a different modifier as the result of the attack, the new modifier is not used until the next attack is resolved.
If it is not obvious which arc the attack is coming from, draw a line from the attacking weapon to the centre of the target's base and see which of the target's arcs the line passes through.
Regardless of the weapon's Strength and any modifiers, a dice that rolls a 1 automatically causes a Superficial Hit.
Damage Effects
If the damage result is not high enough to cause a Direct Hit, it causes a Superficial Hit with no effect.
Head, Body, Legs, Special Locations
Direct Hit. When a location suffers a Direct Hit, it loses a Structure point. If it has none left to lose, it suffers Critical Damage instead.
Devastating Hit. When a location suffers a Devastating Hit, it loses two Structure points. If the location does not have two Structure points remaining, it loses any Structure points it has left and then suffers Critical Damage.
Critical Hit. When a location suffers a Critical Hit, it suffers Critical Damage then loses two Structure points. If the location does not have two Structure points remaining, it loses any Structure points it has left and then suffers Critical Damage again.
Weapon Locations
Weapon Disabled. The Weapon card is flipped face-down. It can't be used until its card is flipped back with a Repair Action.
Detonation (X). The Titan immediately suffers a hit to its body using the Strength shown in brackets, bypassing void shields.
Targeted Attacks. Before making the Hit roll against a unit without active void shields, the controlling player can declare that the attacking unit will make a Targeted Attack. This lets them aim for weaker armour or attempt to cripple a certain location. When making a Targeted Attack, apply a -2 modifier to the Hit roll, but instead of rolling the Location dice (as previously described), the attacking player can choose a target location, including which of the target's weapons is hit if the Weapon location is targeted.
A Targeted Attack cannot be made if it would mean that a score of 7 or higher would be needed to score a hit after taking any other modifiers into account, regardless of the fact that a 6 always scores a hit.
Targeted Attacks cannot be made for attacks that can potentially hit more than one model, for example, those that use a Blast marker, Flame template, or hit all models within a certain range.
Critical Damage
Each of a Titan's locations has a Critical Damage track made up of three numbered holes, arranged in a triangle. The first time a Titan suffers Critical Damage, place a Status marker in the first (yellow) hole. If it suffers Critical Damage again, move the marker to the middle (orange) hole. If it suffers Critical Damage a third time, move the marker to the last (red) hole. If a location suffers Critical Damage while a Status marker is in the red Critical Damage hole, the Titan suffers Catastrophic Damage instead (see page 36).
Each hole on the Critical Damage track has one or more damage effects, which are detailed as follows. While a hole has a Status marker within it, all of its damage effects apply.
Damage Effects
MIU Feedback. The mind impulse unit has been hit, disrupting the crew's link to the manifold. Any Command checks made for the Titan have a -2 modifier.
Moderati Wounded. The moderati overseeing the gunnery crews has been hit. Any Hit rolls made for the Titan's attacks have a -1 modifier.
Princeps Wounded. The attack has grievously wounded the Princeps, who is at risk of passing out. At the start of each Strategy phase, roll a D6. On a result of 1, the Titan takes Shutdown orders. In addition, the Titan automatically fails any Command checks it makes.
Reactor Leak (X). The Titan's reactor containment fields are failing. In each End phase, advance the Titan's Reactor Status marker a number of times as shown in the brackets.
VSG Burnout. The Titan's void shield generators have burned out - its void shields collapse immediately. The Titan cannot use "Raise Shields" Repair Actions until this damage has been repaired.
Stabilisers Damaged. The Titan staggers as its stabilisers struggle to keep it upright. In each End phase, roll a D6 for the Titan. On a 1-3, it turns 45° to the left. On a 4-6, it turns 45° to the right.
Locomotors Seized. Massive gears within the Titan's legs grind as it tries to move. The Titan's Speed and Manoeuvre characteristics (both the normal and boosted values) are halved, rounding down. If this reduces a normal value to 0, the Titan must push the reactor to use the boosted value if it wishes to move/turn.
Immobilised. The Titan's legs and torso are frozen in place. It cannot move or make any turns.
Structurally Compromised Titans. Some mission objectives and Stratagems refer to Structurally Compromised Titans. A Titan is Structurally Compromised when it has no Structure points remaining on a location, or has a Status marker in the red Critical Damage hole on any of its locations.
Weapon Locations: Almost all Titans carry more than one weapon, each of which counts as a separate Hit location. When a Titan's weapons are hit by an attack, randomly determine which of them is hit. If the Titan has a carapace weapon, roll a D6. On a 1-2, the left arm weapon is hit, on a 3-4, the carapace weapon is hit, and on a 5-6, the right arm weapon is hit. If it does not have a carapace weapon, roll a D6. On a 1-3, the left arm weapon is hit, and on a 4-6, the right arm weapon is hit. Weapons that are disabled can still be hit.
If the attacking weapon has no line of sight to the chosen weapon, roll again to see which weapon is hit. If a Targeted Attack is made, the attacking player does not need to pick a weapon at random - instead, they can pick which weapon is hit.
Catastrophic Damage
Though many refuse to believe it, even a god-engine is not invincible. When a Titan receives enough Critical Damage, it will suffer Catastrophic Damage - roll a D10 on the table below. If the Titan's Reactor Status marker is in a hole with an orange indicator, add 1 to the result. If it is in a hole with a red indicator, add 3 to the result.
Catastrophic Damage Table
| D10 | Result |
|---|---|
| 1 | Silenced: The Titan counts as having been destroyed and will play no further part in the battle, but is left in place. It can still be targeted and collided with by other units; if it suffers any damage, it falls, as described to the right. |
| 2‑4 | Laid Low: The Titan moves D6" in a random direction (determined by a Scatter dice) then falls as described to the right. This may cause it to collide with other units, as described on page 31. |
| 5‑7 | Wild Fire: The Titan turns to face a random direction (determined by a Scatter dice), then shoots with each of its weapons that is not disabled, one after the other. Each one must target the nearest unit, friend or foe, that is within arc, range and line of sight. Count the Titan's Ballistic Skill as 5+ while resolving these shots. Then the Titan falls, as described to the right. |
| 8‑9 | Magazine Detonation: The Titan is destroyed. Roll a D3 and add the Titan's Scale. Each model within that many inches of the Titan before it is removed suffers D3 hits using the highest Strength from among the Titan's weapons, regardless of whether they have been disabled - Melee weapons are not counted. |
| 10+ | Catastrophic Meltdown: The Titan is destroyed. Roll a D3 and add the number of holes on the Titan's Plasma Reactor Status track - each model within that many inches of the Titan before it is removed is hit by the blast. Each unit that is hit suffers D6 hits, bypassing void shields, with a Strength equal to the Titan's Scale+1. |
Falling Titans. The death of a Titan is not something which can be easily ignored; wherever their colossal mass falls, utter devastation is sure to follow.
When a Titan falls, roll a Scatter dice and draw a straight line in that direction from the edge of the Titan's base a number of inches equal to its Scale. Any unit that the line touches, or which is within 2" of the line, is hit by the falling Titan. If a Hit is rolled, the Titan falls where it stands and any unit within 2" of its base is hit instead. In either case, the Titan is destroyed.
A unit that is hit suffers D6 hits with a Strength equal to the falling Titan's Scale.
Destroyed Titans
When a Titan is destroyed, remove it from play. If a crater or pile of wreckage approximately the same size as the Titan's base is available, put it in the destroyed Titan's place. This counts as Difficult terrain and Dangerous terrain (if the Advanced Terrain rules on page 43 are being used).
Smash Attacks
Most Titans are not designed for close quarters combat, but when there is no other option, they can use their bulk to attack the enemy. A Titan can make a Smash Attack in the Combat phase in addition to any other attacks it makes. A Smash Attack has the following profile and uses the Titan's Front arc:
| Weapon | Range S | Range L | Accuracy S | Accuracy L | Dice | Strength | Traits |
|---|---|---|---|---|---|---|---|
| Smash Attack | 1" | - | - | - | D3 | Scale+1 | Melee |
The End Phase
The End phase is usually over very quickly, and is mainly a chance for players to prepare for the next round.
Resolve End Phase Effects
Some game effects take place during the End phase. For example, if a Warlord Titan has a Reactor Leak (a form of Critical Damage), it states that the Reactor Status marker is advanced a number of times in each End phase.
If a player has multiple effects that must be resolved in the End phase, they can choose the order in which to resolve them. If both players have effects that are resolved in the End phase, the First Player resolves all of theirs first then the other player resolves theirs.
Designer's Note
Don't Forget the End Phase!
Although it might not look like the End phase does much, be careful not to forget it! A lot of rules are triggered in this phase, especially once you start using the Advanced Rules. For example, any Order dice that are on Command Terminals are removed in the End phase.
Titanic Weaponry
Weapon Characteristics
A unit's Command Terminal has a number of spaces for Weapon cards, which must be selected before the start of the battle. Each Weapon card shows which Class of Titan it can be chosen for, and which slot(s) on the Command Terminal it can occupy.
Each Weapon card shows the following characteristics:
Firing Arc
A weapon's firing arc (explained on page 26) is represented by a graphic. The graphic assumes that the Titan is facing towards the top of the Command Terminal - most weapons (particularly arm-mounted ones) generally have the Titan's Front arc as their firing arc.
Range and Accuracy (ACC)
This shows the weapon's range in inches. Weapons have two ranges: Short and Long. These are primarily used to determine the Accuracy modifier (which affects any Hit rolls made for the weapon), but might also be referenced by other in-game effects.
Dice
A weapon's Dice value shows how many dice are rolled when attacking with it. In essence, it is a representation of how rapidly the weapon can fire - a gun with Dice 6 fires a lot more shots in one go than one with Dice 1.
Strength (STR)
A weapon's Strength is a measure of its ability to punch through a target's armour. The higher a weapon's Strength, the more likely its attack will inflict damage on a successful hit.
Traits
Most weapons have one or more traits. These are special additional rules which either give the weapon bonuses or penalties in certain situations, or mean that it attacks in a unique or unusual fashion. The most common traits are listed below - others might appear on the Weapon cards themselves.
Barrage
Barrage weapons can fire indirectly at a target to which they do not have line of sight, so long as the target is still within range and arc. Firing indirectly confers a -2 modifier on the Hit roll.
Blast (3"/5")
Before rolling To Hit with a Blast weapon, place the 3" Blast marker or 5" Blast marker (determined by the number in brackets) so that its central hole is completely over the target model's base and within line of sight of the attacking weapon, and no part of the marker is touching any friendly models. Then, check to see whether the central hole is within range and arc. If it is not within arc, the shot is wasted and has no effect. If it is not within range, do not roll To Hit - each shot will scatter as follows:
Once the marker has been placed, roll To Hit as normal. If the roll is successful, the marker is not moved; otherwise, roll the Scatter dice and move the Blast marker D6" in the direction that is shown - if a Hit is rolled, use the small arrow to determine the direction of scatter. Note that the Blast marker can scatter out of the Titan's line of sight, or out of the weapon's range or arc - this represents the shot ricocheting or blasting clear through intervening terrain. The centre of the firing Titan's base should still be used as a reference point to determine which of the target's arcs is hit.
Whether or not the marker moves, each model that is touched by the marker is hit once. If the central hole of the Blast marker is fully over a model's base, that model is hit twice.
If a Blast weapon has a Dice value of 2 or more, make each Hit roll separately (scattering any missed shots individually). If more than one model is hit, the attacking player chooses the order in which to resolve them. Blast weapons cannot make Targeted Attacks.
Carapace
Some Titans carry weapons high up on their carapace - usually long range support weapons with the firepower to level a hab-block in moments. Carapace weapons cannot target units that are within a number of inches equal to the firing unit's Scale, unless the target is at least the same Scale as the attacker. For example, a Reaver (Scale 8) cannot attack units within 8" with its carapace weapon, unless the target unit is of at least Scale 8.
Concussive
Some munitions produce a concussive blast that can cause even the largest Titan to stagger. If an attack from a Concussive weapon scores any hits on a Titan that are not deflected by its shields, roll a D6. On a 1-2, the target pivots 45° to the left; on a 3-4, it moves D3" directly away from the attacking unit without changing its facing; on a 5-6, it pivots 45° to the right. If the Titan suffers Catastrophic Damage as a result of the hit, roll to see if the Titan is turned or moved before rolling on the Catastrophic Damage table. In the Advanced Rules, a Knight Banner that suffers any Direct or Critical Hits from a Concussive weapon is automatically Shaken instead (see page 47).
Draining
Draining weapons put a great strain on the plasma reactor of the Titan that fires them. Before attacking with a Draining weapon, the Titan's reactor must be pushed. A unit that does not have a plasma reactor cannot use a Draining weapon. Some weapons have (Draining) after another trait - this means that they do not have the trait by default, but if they push the plasma reactor before attacking with the weapon, it gains that trait for the duration of the attack.
Firestorm
Firestorm weapons unleash gouts of blazing promethium or some other volatile fuel. Instead of rolling To Hit with a Firestorm weapon, place the Flame template so that the narrowest part is touching the end of the firing weapon and the centre of the wide end is within the weapon's firing arc. It cannot be placed so that it is touching any friendly units. The closest model to the firing unit that is touched by the template suffers a number of hits equal to the weapon's Dice value; each other model that is touched by the template (except the firing model!) suffers one hit. Note that it is not necessary to make the Hit rolls - these hits are automatic. Firestorm weapons cannot make Targeted Attacks.
Fusion
Fusion weapons generate beams of incredible heat which cause even the thickest armour to run like wax at close quarters. If the target of a Fusion weapon is within Short range, roll a D10 rather than a D6 for the Armour roll.
Limited (X)
Some weapons are so enormous or power-hungry that a Titan can only carry enough ammunition for a few shots. A Limited weapon can only be used a number of times equal to the number in brackets - after this it is expended and cannot be used to make any more attacks for the rest of the battle.
Maximal Fire
Some weapons, especially those such as plasma weaponry, can draw additional power from the Titan's reactor to increase their destructive potential. Before making a Hit roll with a weapon with this trait, the controlling player can declare that it will fire on Maximal Fire mode. If they do so, the weapon's Strength is increased by 2. However, for each Hit roll of a 1 (before any modifiers or re-rolls), increase the Titan's Reactor level by 1.
Melee
Titans are sometimes fitted with massive claws, fists or chainblades, allowing the Princeps to take matters into their own hands at close quarters. When attacking with a Melee weapon, the controlling player can always choose the target location (as though they were making a Targeted Attack, but without the To Hit modifier).
Ordnance
Ordnance weapons fire high calibre explosive shells which can cause significant damage to an unshielded target. When attacking with an Ordnance weapon, Armour rolls of 1 can be re-rolled.
Paired
Sometimes, a Titan will carry a pair of weapons, slaved to fire together at the same target. Check the line of sight from each of the weapons separately; if only one has line of sight, the weapon's Dice value is halved. If the target is obscured from the point of view of only one weapon (see page 33), half of the dice rolled suffer the To Hit modifier for an obscured target.
Quake
Quake weapons strike their target with such force that the very ground ruptures and shakes. If a unit is hit by a Quake cannon and the hit is not deflected by its shields, it is caught in the seismic blastwave. Until the end of the following Movement phase, the target's default and boosted Speed values are halved (rounding down).
Rapid
Rapid weapons spit an overpowering stream of shots, saturating the target with weapons fire. For each Hit roll of 6 when attacking with a Rapid weapon, it causes 2 hits rather than 1. If a roll of 6 To Hit was required, this rule has no effect.
Rending
Rending weapons have the potential to cause horrific damage if they strike true. If the Armour roll for a Rending weapon is 6, roll a D3 and add it to the result.
Shieldbane
These weapons are capable of tearing clean through even the largest void shields. Any Shield saves made against Shieldbane weapons have a -1 modifier.
Voidbreaker (X)
Although Voidbreaker weapons are unlikely to cause any physical damage to a target, this does not matter - their purpose is the disruption of void shields, pure and simple. If a Voidbreaker weapon hits a target with active void shields, the target's controlling player must make a number of additional saves as shown by the number in brackets after the trait.
Vortex
Vortex weapons make use of bewildering technology to open an unstable warp rift at the target point. They follow use all of the rules for Blast weapons, but use the 3" Vortex template instead. Each model that is touched by the template suffers D6 Strength 10 hits, bypassing void shields.
After resolving the attack, leave the Vortex template where it is. In the End phase of each turn, the marker moves D6" in a random direction, hitting anything it touches as it moves. If a Hit is rolled, the template is removed instead.
Warp
Warp weapons, most famously warp missiles, are fired in realspace but translate to the Warp for the majority of their flight, only returning to reality as they reach their target. If an attack made by a Warp weapon hits its target, make a Location roll (or choose a location if making a Targeted Attack). Then, regardless of whether the target is shielded, roll a D6. On a result of 1, the target location loses 1 Structure point. On a result of 2-3, the target location loses D3 Structure points. On a result of 4-6, the target location suffers Critical Damage.
Stop!
This is the end of the Basic Rules for Adeptus Titanicus. If you have read this far, you now know enough to fight your first few battles. We recommend trying out the Titanic Clash mission on page 40 before reading any further.
After the mission, you will find a whole section devoted to the Advanced Rules. These rules add more detail to the game, but also introduce additional complexity - as such, we recommend you have played at least one game using the Basic Rules before you start using the advanced ones.
Titanic Clash
Later in this book (page 52 onwards), there is a section of detailed rules for playing games of Adeptus Titanicus. That section presents multiple ways to play, as well as guidelines for assembling a force of Titans. However, it is recommended that new players use this mission for their first few battles, as it lets them fight a battle using their collections without having to learn any of the Advanced Rules.
Preparing for Battle
Forces. Each player chooses up to three Titans. They can all be of the same Class or they can be different Classes - this is up to each player. Each Titan requires a Command Terminal. Each player sets up their Command Terminals on the table in front of them and puts a Status marker in the first hole of each Status track as described on page 27.
Each player then totals up the Scale of the Titans in their force. For example, if they had a Warlord (Scale 10) and two Warhounds (Scale 6), their total would be 22.
The Battlefield. This mission is best suited to a battlefield between 3'x3' and 4'x4' in size - any flat surface will do. Some terrain features can be set up to break up lines of sight and make the battlefield more interesting - the players should agree on a terrain set-up with which they are both happy. Full rules for battlefield terrain can be found on page 63, but as a simple rule for this mission, a Titan can move across any terrain which is no more than half its height - anything taller blocks its movement.
Once the battlefield has been set up, the players roll off. The winner chooses whether they will take the Opus Titanica or give it to their opponent. The player with the Opus Titanica then divides the battlefield into two equal halves.
Deploying Forces. The player with the Opus Titanica picks one of the halves of the battlefield to be their territory - the other is their opponent's territory. Then, starting with the same player, the players take turns setting up one of their Titans anywhere within their territory, at least 12" from their opponent's territory. Once one player has finished setting up their Titans, the other player sets up any Titans they have left.
Fighting the Battle
Battle Begins. The first round of the battle begins and plays through as described in the rules with one exception - the First Player is the player holding the Opus Titanica (there is no need to roll).
Battle Length. The battle lasts for four rounds. At the end of the fourth round, check the Total Annihilation objective that follows to see who is victorious.
Objective: Total Annihilation. The object of this battle is to eradicate the opposing force. For each enemy Titan that has been destroyed at the end of the battle, score Victory points equal to twice its Scale. For each enemy Titan that has not been destroyed, but which has been Structurally Compromised (see page 35), score Victory points equal to its Scale. The player with the lowest total Scale, as determined at the start of the battle, scores a number of bonus Victory points equal to the difference in total Scales.